Importing Beans
Specifying libraries
The BeanContext
Design time information
Non-component Beans
Using Beans
Event propagation
Exceptions while executing handlers
Property propagation
Custom property editors and customizers
How custom Beans are stored
Provided Beans
In addition to the build-in Swing components (which are also Beans), you can import custom Beans from JAR archives. A Bean must fulfill these minimum requirements so it can be imported:
It must be specified as being a Bean in the JAR's manifest. The manifest entry for a Bean might look like this:Name: de/muntjak/datebean/DateBean.class
| |
It must be prepared to be instantiated with java.beans.Beans.instantiate(ClassLoader, String). This means, the Bean must at least have a public default (no-arguments) constructor.
| |
Importing Beans Top of page
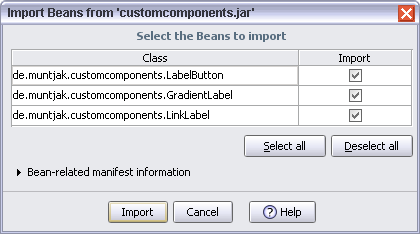
Select 'File | Import Beans' and, from the file dialog, select
Tutorial/Examples/customcomponents.jar. The 'Import Beans' dialog opens where you choose which Beans to import.
|
If you encounter
NoClassDefFoundErrors when trying to import Beans, read the next section about specifying libraries.
| Note: Imported Beans which were not added to a layout are not saved and will not be present once you quit and restart RADi. |
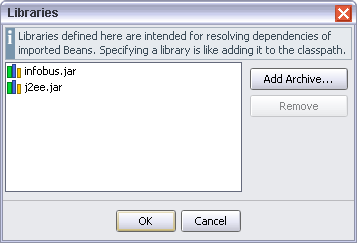
Specifying libraries Top of page
Choose 'File | Libraries...' to open the 'Libraries' dialog. Libraries defined here are intended for resolving dependencies of imported Beans (typical candidates might be
activation.jar or infobus.jar). Libraries may be either JAR or ZIP files.
|
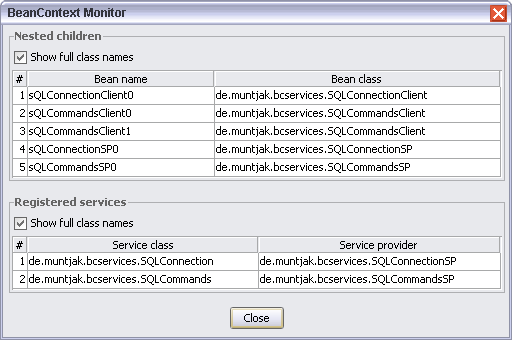
The BeanContext Top of page
RADi provides one
BeanContextServices implementation per layout. Beans implementing either BeanContextChild or BeanContextProxy are automatically added to the bean context. Service providing Beans are responsible for registering their service(s) with the context.Note: The
BeanContext is valid only while the test frame is displayed and will be cleared when the test frame is closed.
By choosing 'Layout | BeanContext Info...' you see an overview on the bean context's nested children and registered services.
|
Design time information Top of page
BeanContext aware Beans can get design time information from the enclosing bean context by calling getBeanContext().isDesignTime(), other Beans may call java.beans.Beans.isDesignTime(). While no test frame is displayed, both methods will return true, else both methods will return false.
| Note: Especially Beans performing automated tasks should make sure that such tasks are not performed at design time, if possible. (As stated above, RADi might create any number of Bean instances existing simultaneously and several Beans performing some expensive task might noticeably decrease performance.) |
Non-component Beans Top of page
Non-component Beans are generally not derived from
java.awt.Component and encapsulate some application logic. Though non-component Beans have a visual representation inside RADi, you cannot add them to the GUI and they are not visible in a running application.
If you are a Bean developer and your Bean is derived from
java.awt.Component but, for some reason, you want it to be treated as non-component Bean, you can achieve this by implementing java.beans.Visibility and let the implementation return true for avoidingGui().
Using Beans Top of page
The 'Beans' button in the component palette has a popup menu attached from which you select Beans.
|
Inserting Beans is different for component Beans and non-component Beans. To insert a component Bean into the design grid, you drag the icon to a grid cell, just like you do with any other component. To insert a non-component Bean, just click the 'Custom Beans' button. The Bean will be added to the 'Non-Component Beans' panel which is initially invisible.

|
| The 'Non-Component Beans' panel |
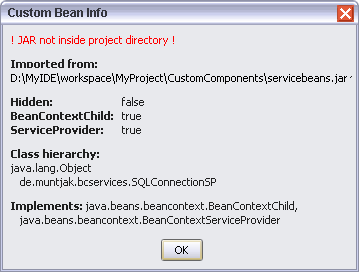
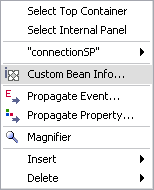
From the context menu of a custom Bean you can open the 'Custom Bean Info' dialog which displays the path to the imported JAR. If the JAR is not inside the project directory, you will see a warning.
|
|
Event propagation Top of page
Event propagation allows for simple inter-Bean communication. You have to specify an event source and one or more event targets. As the specified listener method is called on the event source, the specified method of the event target will be executed.
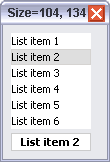
As a simple example we will setup a list and a text field such that the text field displays the list's selected value.
|
| List and text field |
To do this programatically you would have to code:
list.addListSelectionListener(new ListSelectionListener() {
|
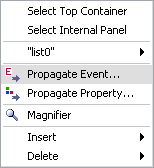
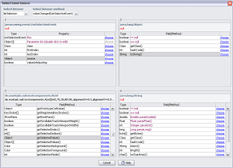
We start by selecting 'Propagate Event...' from the list's context menu. The 'Select Event Source' dialog opens.
|
| |
| Click to view full size | ||
Because we want to react to changes in the list selection, we select the
listSelection item from the 'Select listener' combo box. A ListSelectionListener has only one method, so the selected listener method is okay.

|
In the first table, the
ListSelectionEvent's properties are displayed. Click inside the 'source' row.
|
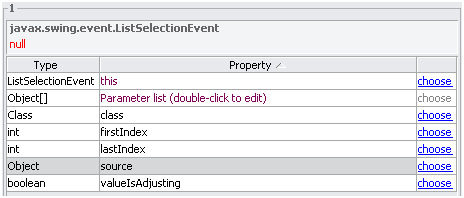
Though the event's "source" property has a return type of
Object, RADi knows that the event source is the list, so the second table displays all of an AList's (non-deprecated) public methods which have a non-void return type and take no arguments. Scroll to the 'getSelectedValue()' row and select it.
|
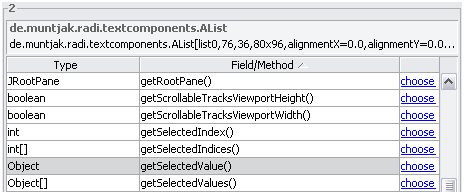
getSelectedValue() has a return type of Object, so the third table now displays public Object methods. Search for the 'toString()' row and click choose.
|
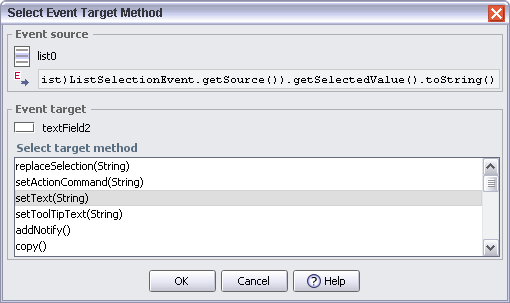
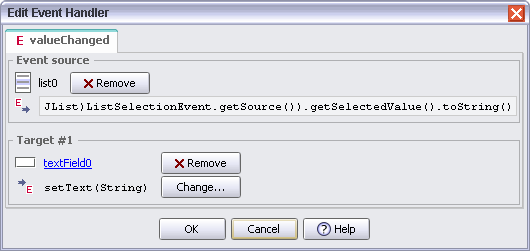
Specifying the event source was the hard part, now we will define the event target (method).
Right-click the text field and select 'Event Target...' from its context menu.
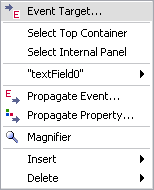
|
| |
String. Because we want to display the selected item as the text field's text, we choose setText(String). To test the new event handler, display a test frame and select items from the list.
Some tips:
| If the target method takes no arguments, you should choose 'this' (the event) from the first table. | |||||
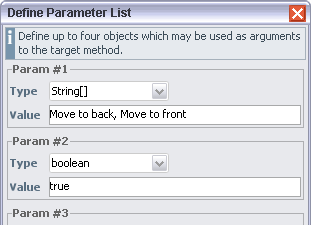
You can specify a constant parameter list to provide arguments to the target method.
| |||||
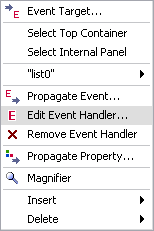
The 'Edit Event Handler' dialog allows to remove entries and to change target methods.
| |||||
|
Copy and paste issues: If you copy and paste an event source, the event handler will not be copied. If you copy and paste an event target, the copied component will still be an event target (and the event handler will contain one more entry). |
| Note: You should know that, when propagating the same kind of event several times (for one event source), the order of propagation is the reverse order of handler definitions. |
Property propagation Top of page
Property propagation describes two slightly different mechanisms:
Propagate some property from a source Bean to a target Bean. The property is set on the target Bean immediately as the property handler is defined and, if the property is bound, on future changes of the property value (if a bound property changes, the Bean will fire a PropertyChangeEvent).
| |
| Propagate the return value of some arbitrary method of a source Bean to a target Bean. |
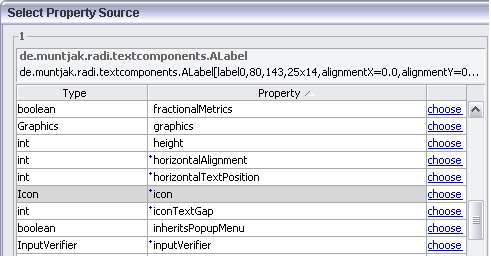
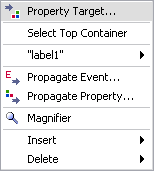
To specify the property source, choose 'Propagate Property' from a component's/Bean's context menu. From the 'Select Property Source' dialog you select a property. All properties whose getter method takes no arguments are listed.

|
| |
| Specify a property source ... | ... and a property (bound properties are preceeded by a small asterisk) | |
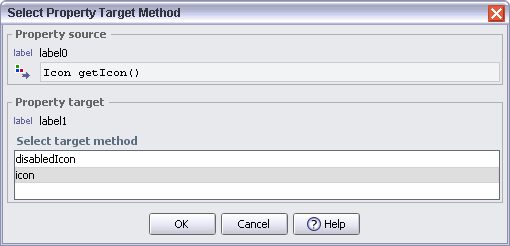
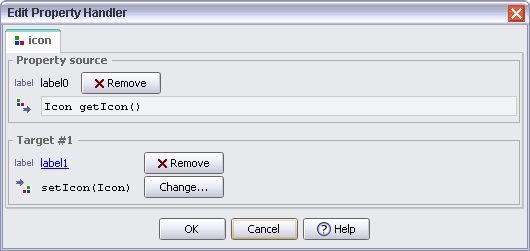
In the next step you specify a property target and a target method. The type of the property and the parameter type of the method must match.
|
| |
| Specify a property target ... | ... and a target method | |
The 'Edit Property Handler' dialog allows to remove entries and to change target methods.

|
|
Exceptions while executing handlers Top of page
Both event handlers and property handlers might raise exceptions as they are executed.
With property handlers you will see an exception dialog as soon as you have defined the handler.
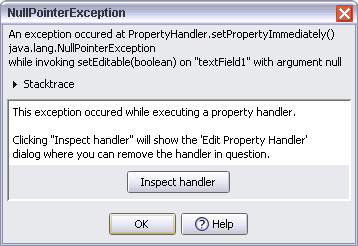
|
JTextField.setEditable(JLabel.getBorder().isBorderOpaque())with the label's border being
null (just to demonstrate how easy it is, to force exceptions).
With event handlers, an exception might be thrown as you trigger the event.

|
FocusListener:JTabbedPane.setSelectedComponent(FocusEvent.getOppositeComponent()).Because the argument is a component which is not a child of the tabbed pane, the tabbed pane throws
java.lang.IllegalArgumentException: component not found in tabbed pane (wrapped in an InvocationTargetException because RADi executed a reflective call).
There's nothing more you can do but remove the handler in question.
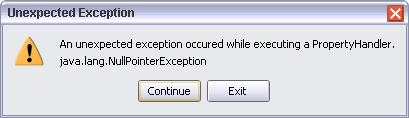
Note: As is true with RADi, the RADi runtime library will catch all exceptions thrown while executing handlers. If RadiLoader was set to silent mode, a user will not notice anything about exceptions thrown, else a dialog will pop up (allowing you to either continue or exit) or the exception will be reported via System.err.
|
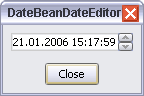
Custom property editors and customizers Top of page
If a custom Bean's
BeanInfo specifies any custom property editors (with PropertyDescriptor.setPropertyEditorClass(Class)), RADi instantiates the editor class and attaches the editor to the specified property. The custom editor will be displayed in a modal dialog, together with a "Close" button.
|
| Custom date editor |
Note: Also custom editors registered with the PropertyEditorManager will be recognized. (If, for a property type of XYZ, there exists a class named XYZEditor, Java will automatically register the XYZEditor class as the editor for all properties of type XYZ).
|
If the
BeanInfo's BeanDescriptor specifies a Customizer, the first row of the property sheet shows the customizer class and a "Customize..." label. Clicking the label will open the Customizer dialog, displaying the customizer component and a "Close" button.
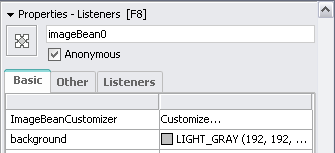
|
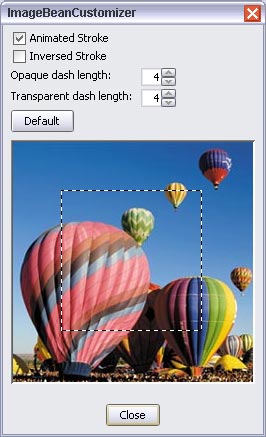
|
| A Customizer |
How custom Beans are stored Top of page
RADi stores a Bean's state by storing all the public properties which a user (you) has edited. If a property is of known type
Dimension,URL, KeyStroke), it will be stored in a RADi-special format, else it will be stored using XMLEncoder. If this fails (for example because the property type provides no default constructor) and the property class implements Serializable, it will be stored using object serialization.
If a Bean's state depends on non-public properties, it must provide a
BeanInfo class and either
let the BeanDescriptor return true for isHidden(), or
| |
set the BeanDescriptor's "hidden-state" attribut to a value of Boolean.TRUE,
|
Provided Beans Top of page
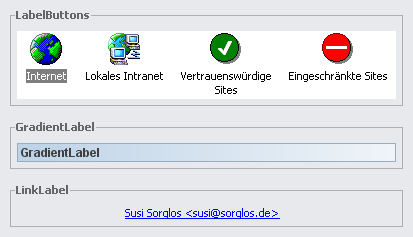
LabelButton is a toggle button combining an icon with a (multi-line) label. In contrast to the Swing JToggleButton, the selected state is visualized by selecting the button label and (very important!), if you define a multi-line label, the button will have a reliable preferred width (with LabelButton you separate lines with the 'plus' sign, e.g. Line1+Line2).
| |
GradientLabel is an opaque label with a gradient background and a line border. The gradient is defined by properties startColor, endColor and bias (between 1 and 100), additionally you can specify the borderColor and margin. Use a GradientLabel to divide and name sections of a layout.
| |
LinkLabel is a label whose text is underlined and changes color on rollover. Its default cursor is the hand cursor. If you want an action to be performed as the user clicks the label, attach an ActionListener.
| |
RADi/Tutorial/cc_sources.
|