Export options
Frame settings
Dialog settings
Considerations when extending JApplet
When you should re-export layouts
Code generation
Inner classes
|
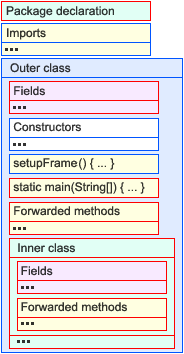
Exporting a layout means, that RADi generates a Java source code file, sufficient for you to build upon (either by extending or by editing it). RADi does not create the entire GUI code, but only a small class with just the necessary import declarations, member declarations, constructors, inner class code and forwarded Action/EventListener methods. (The task of actually creating the GUI is done by the RADi runtime library as it processes your layout definition files).
|
| The typical code layout of an exported JFrame class (optional code elements have a red border) |
Export options Top of page
|
| ||||||||||||||||||||||||||||||||||||||||||||||||||||||||||||
|
Enter a package name or select one of the already defined packages for this project. (A package declaration is not required by RADi, but since Java 1.4 the default package is discouraged.) | ||||||||||||||||||||||||||||||||||||||||||||||||||||||||||||
|
| ||||||||||||||||||||||||||||||||||||||||||||||||||||||||||||
| The class name should be a valid Java class name. (No spaces, first character upper case.) | ||||||||||||||||||||||||||||||||||||||||||||||||||||||||||||
|
| ||||||||||||||||||||||||||||||||||||||||||||||||||||||||||||
| With 'Automatic export' selected, the layout will be exported every time the class definition file is saved. | ||||||||||||||||||||||||||||||||||||||||||||||||||||||||||||
| ||||||||||||||||||||||||||||||||||||||||||||||||||||||||||||
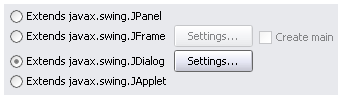
Decide, if the exported class should extend JPanel, JFrame, JDialog or JApplet.If your class extends JFrame, you can choose to create the main method. For frames and dialogs you can set various properties (see Frame settings, Dialog settings).If your class extends JApplet, the init() method is generated automatically.
| ||||||||||||||||||||||||||||||||||||||||||||||||||||||||||||
|
| ||||||||||||||||||||||||||||||||||||||||||||||||||||||||||||
| If selected, all components and actions of the layout will appear as fields of the exported class. If deselected, only non-anonymous components and actions will show up (so you can concentrate on the one your interested in). | ||||||||||||||||||||||||||||||||||||||||||||||||||||||||||||
| ||||||||||||||||||||||||||||||||||||||||||||||||||||||||||||
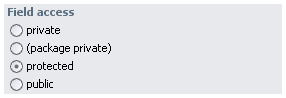
Member fields are either Component or Action objects. Choose an access specifier.
| ||||||||||||||||||||||||||||||||||||||||||||||||||||||||||||
| ||||||||||||||||||||||||||||||||||||||||||||||||||||||||||||
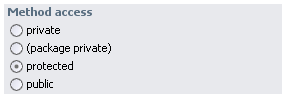
Choose an access specifier for forwarded EventListener and Action methods.
| ||||||||||||||||||||||||||||||||||||||||||||||||||||||||||||
|
| ||||||||||||||||||||||||||||||||||||||||||||||||||||||||||||
| With 'All methods abstract' selected, the whole class is made abstract so you have to extend it. | ||||||||||||||||||||||||||||||||||||||||||||||||||||||||||||
|
| ||||||||||||||||||||||||||||||||||||||||||||||||||||||||||||
Pressing 'Export' will generate the source (.java) file. Pressing 'Export-Compile' will generate the source file and additionally invoke javac (the Java compiler) on the source file.
| ||||||||||||||||||||||||||||||||||||||||||||||||||||||||||||
Note: At 'Preferences | Compiler' you can set some compiler options. By default, javac will create 1.4 compatible class files and add debug information for line numbers and source file names.
|
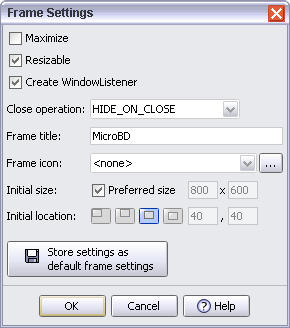
Frame settings Top of page
The code generator will create a
private void setupFrame() method which is called from all the different JFrame constructors. It sets the frame's title, location and size, the default close operation and the frame's maximized and resizable state. You can also choose to add a WindowListener to the frame.
|
|
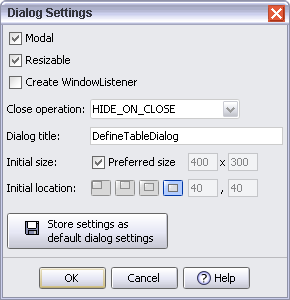
Dialog settings Top of page
The code generator will create a
private void setupDialog(Window owner) method which is called from all the different JDialog constructors. It sets the dialog's title, location and size, the default close operation and the dialog's modal and resizable state. You can also choose to add a WindowListener to the dialog.
|
|
Considerations when extending JApplet Top of page
There are two drawbacks implementing applets with RADi: First, the RADi runtime library requires Java 1.4 and second, radirt.jar must be downloaded. So, if your applet should download in minimum time or if it should run in browsers without a Java plug-in, you should write the GUI code by hand and not use RADi.
With unsigned applets there are two restrictions:
|
|
Fields and methods of the exported class must be declared public, else you will see a java.security.AccessControlException. (The required permission is java.lang.reflect.ReflectPermission "suppressAccessChecks")The same holds true for inner classes where additionally the inner class itself must be public.
|
|
|
You cannot call the RadiLoader method that specifies a locale, because an unsigned applet is not allowed to change the default locale. (The required permission is: java.util.PropertyPermission "user.language", "write") |
Applets know the concept of a code base URL. If not defined explicitely (with the CODEBASE attribute of the APPLET tag), this is the directory where the HTML file, containing the APPLET tag, is located.
If RadiLoader detects a class derived from
JApplet, it tries to resolve all references relative to the applet's code base.
When exporting a JApplet class, RADi additionally exports a HTML file containing this minimal APPLET tag:
<APPLET CODE="package.className.class" ARCHIVE="radirt.jar" WIDTH=width HEIGHT=height></APPLET>
|
radirt.jar and it is located in the code base directory". (Actually you should copy radirt.jar to the project directory, which is the code base for local testing).Width and height are calculated from the layout's preferred size using the current look and feel.
Please note that this HTML file will be overwritten each time you export the layout.
If you decide to extend JApplet, follow these steps:
| 1) Create the GUI as usual and make sure, that all resources go to the project's 'resources' directory. |
| 2) Export and compile the layout class(es) (RADi will also export a HTML file containing the APPLET tag). |
| 3) If your classes are in a sub-directory (such as 'classes'), copy them to the project directory. |
| 4) If not already done so, copy radirt.jar to your project directory. |
5) Point your browser/applet viewer to the HTML file generated (its name is <className>.html, its location is the project directory).
|
| Note: Writing the applet code yourself and importing RADi-generated panels or dialogs will not work. The reason is, that the RADi runtime does not know the code base of your applet and therefore cannot resolve references to resources (not even to the layout definition file). |
When you should re-export layouts Top of page
Whenever you added or removed components, whenever you added or removed
Actions or EventListeners, you should re-export the layout. With 'Automatic export' selected, the layout will be re-exported every time you save changes, so the Java code will always be synchronized with the layout data.
| The export tool bar button shows a layout's export status: | ||
| The layout was never exported. | ||
| The layout is in sync with the class file (at startup RADi assumes that every layout is in sync). | ||
| The layout is out of sync with the class file and you should reexport it sooner or later. | ||
Code generation Top of page
As the code generator parses a previously exported class file, it does the following:
|
|
Checks the package declaration. In case it doesn't match the expected package declaration, parsing is cancelled and the code remains unchanged. | ||||||||||
|
|
Checks the class name. In case it doesn't match the expected class name, parsing is cancelled and the code remains unchanged. | ||||||||||
The code generator will silently update the extends statement if necessary.
| |||||||||||
|
|
Adds missing imports (but doesn't remove unused imports). | ||||||||||
|
|
Adds missing member declarations (but doesn't remove unused member declarations). If it detects a type conflict, it silently changes the field type. The code generator does not update access specifiers of existing declarations. It is legal to remove member declarations or to change access specifiers. | ||||||||||
|
|
Adds missing methods. When changing the type of the exported class, the following methods will be removed:
If you change a class from non- abstract to abstract, bodies of exported methods will be removed.
| ||||||||||
|
|
If you change the type of the exported class, all constructors are removed before the new constructor code is added. You may delete constructors except the one you actually call and you may change a constructor's argument list. If you delete all constructors, constructor code is added again. | ||||||||||
|
|
Adds missing inner classes (but doesn't remove unused inner class code). Silently updates extends statements if necessary. Static and abstract modifiers will be added or removed as needed.
|
| Note: When parsing a source file, RADi assumes that it would compile without error. |
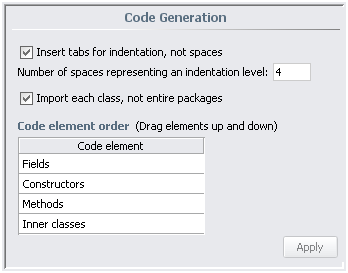
You can define the order of code elements at 'Preferences | Code Generation':
Inner classes Top of page
With RADi, every container can be defined as an inner class. Inner classes give you two advantages:
|
|
The source code will become more structured. |
|
|
Each inner class has its own name space. |
| Note: Suppose you have a tabbed pane defined as inner class and one of the tabbed pane's children is a panel, defined as inner class, too. What you get is not an inner-inner class but two parallel inner classes. |
You define inner classes using the 'Inner Class Settings' dialog which looks very similar to the 'Export Layout' dialog. We will only discuss two items:
|
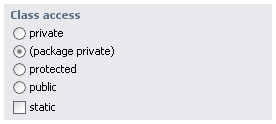
Decide if the exported inner class should be declared private, package private, protected or public.With unsigned applets you must choose public. If you export the enclosing class as abstract class and you plan to extend inner classes, choose protected or public, else, to protect inner classes, choose private or package private.
Inner classes can be static, this means you can create instances without having an instance of the enclosing class. With RADi you will rarely need to specify an inner class as being static.
|
|
|
If selected, the inner class will be exported as abstract class so you have to extend it. Note: If the enclosing class is abstract, this doesn't mean that inner classes need to be declared abstract, too.
If you miss to extend an abstract inner class you will see an exception message as you run the application: 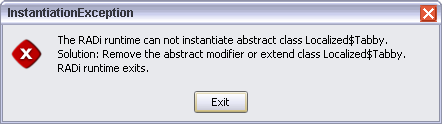
|